How to turn image into embroidery motif by using Berina Embroidery software?
In order that embroidery motifs can be read by the BERNINA embroidery machine, they have to be created by the BERNINA Embroidery software and exported as .EXP file.
Additionally, following embroidery formats can be read by the machine: .PES, .PEC, .XXX, .PCS, .JEF and .DST. BERNINA International AG doesn't warrant that embroidery motifs which have not been created or converted by the BERNINA Embroidery software can be correctly read and embroidered
So I started by exploring possible images to be used as a motif. Bernina warns in the manual that "Simple motifs with a low stitch count are suitable for embroidery on fine material. Densely embroidered motifs, e. g. embroidered motifs with multiple color and embroidery direction changes, are suitable for medium and heavy-weight material."
So, I had to find image which has limited amount of colors and has simple structure to be sure that it can be embroided. Luckily I knew already that Scratch Cat (iconic character of Scratch programming language) has only few colors and is simple enough. So, next steps will explain how that cat was found, prepared an embroided
In the next steps I will describe this process in the details:
First step: Decide what do you want embroid (I recommend to use Creative Commons sources)
text
I went immediately to Wikimedia Commons, because I knew already that there is simple figure presenting Scratch Cat. (which is symbol for graphical programming language developed in MIT). Because Scratch Cat has limited amount of the colors (orange, black and white), I thought that it would be good basis for my embroidery assigment

Here you can see the Wikimedia Common page for Scratch Cat. It was licensed under CC-BY-Share-a-like licence, which was good fit for me. However, Scratch developers have forbidden to use Scratch Cat in certain cirmustances, e.g. in the case where some hackers made encapsulated "mobile version" of ScratchJr which was able to run in OSX and Windows computers. In that case everything else was ok, but Scratch cat wasn't allowed to use.
I decided to download .svg but later on I had to download also hi-res .png file, because of the issues with importing process. See more about that below. Of course I thought that embroidery software would use vector graphcis (svg) instead of bitmap graphics (png), but I was wrong (and after that pretty surprised)
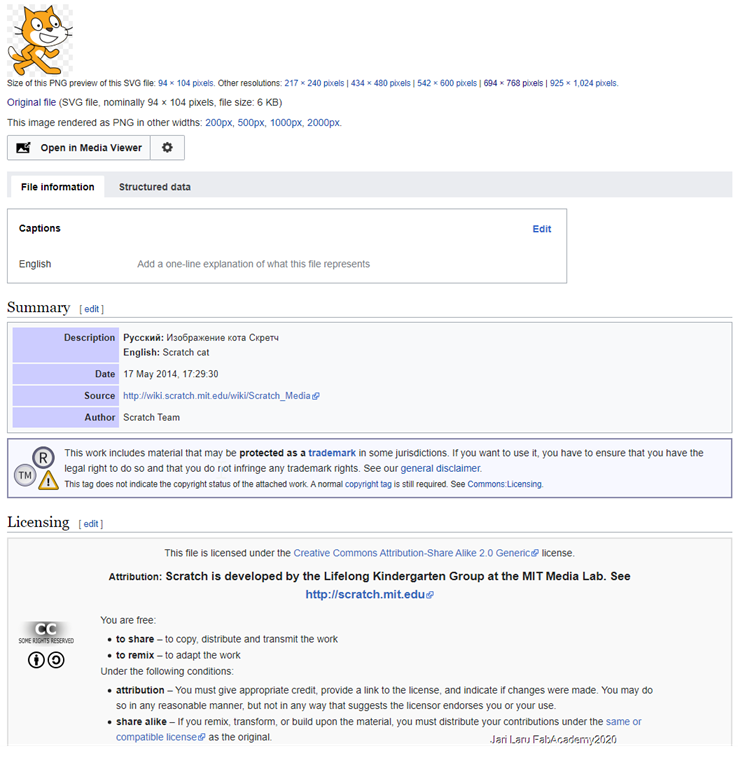
NOTICE: Later on I also did check official Scratch wiki to be sure that image can be used. Here you can see that image is licensed under creative commons license: https://en.scratch-wiki.info/wiki/Scratch_Media
.I dedided to use image available in the official wiki maintained by "Scratch team". In practise both image repositories are trustworthy and reliable.
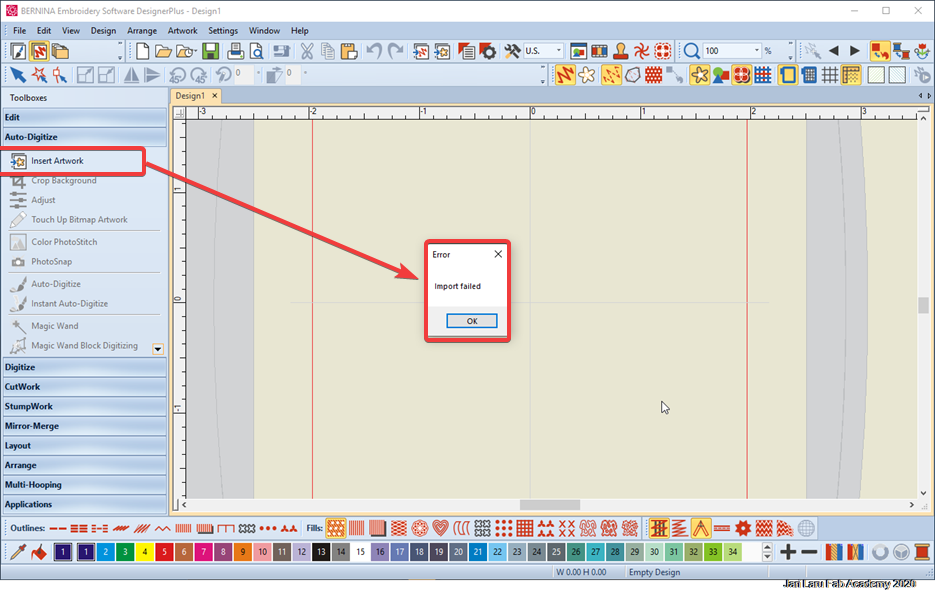
Second step: Import image should be easy and it was, but it wasn't
Of course I thought that I should be able to use vector graphics in this kind of machine, but it wasn't the case. I found that software that I did use even didn't support svg-format. Instead it would accept pixel formats like png or jpg. How big suprise!
Anyway, when I saved cat as png (which was another format supported by Wikimedia Commons) I got same error message again. Finally I did convert .png image into .jpg and then got Bernina software to accept my file. See figure 3. below as an example of "not so useful" error message given by sewing machine
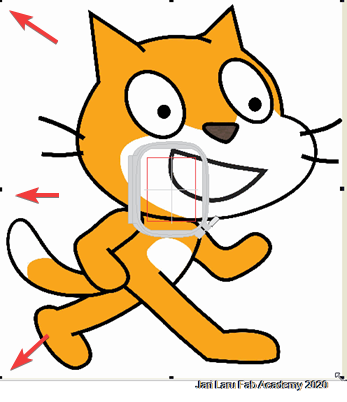
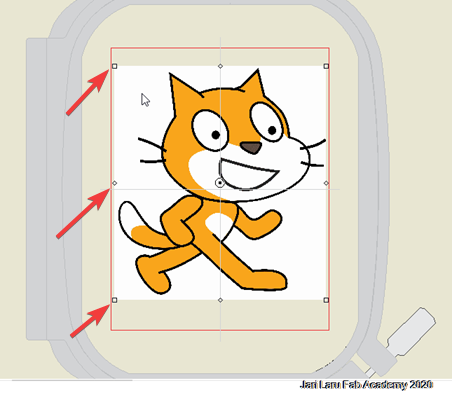
Third step: Resize image and reduce amount of colors
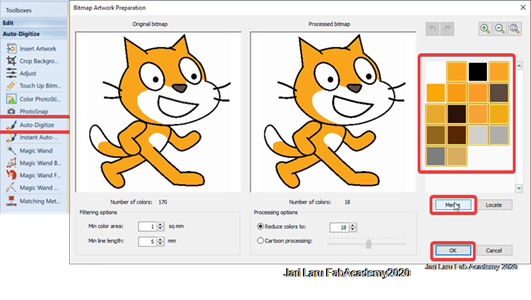
On the left image (figure 4) image is not resized to fit into embroidery frame. It needs to be resized by using some of the handles (see arrows as examples in the figures 4-5). Right image (figure 5 shows the perfect situation where image fits well into frame (embroidery area)
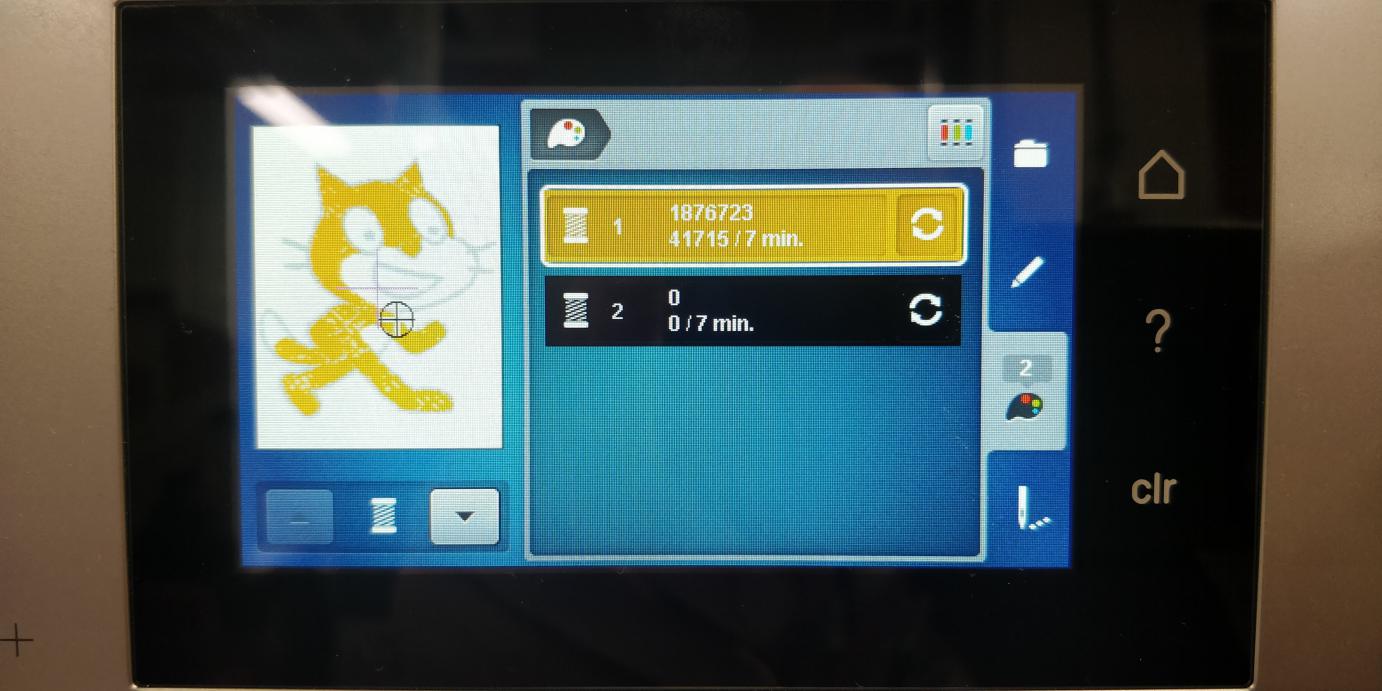
Next I did click the button "auto-digitize" in the menu on left toolbar. Bernina embroidery software recognizes the colors in the picture and recommends the recuded set of the colors. However, I merged all other colors than black and white to orange, in order to reduce number of the colors to three. Finally I had just three colors: 1) white (color of the textile); black (details of the cat); orange (main color)
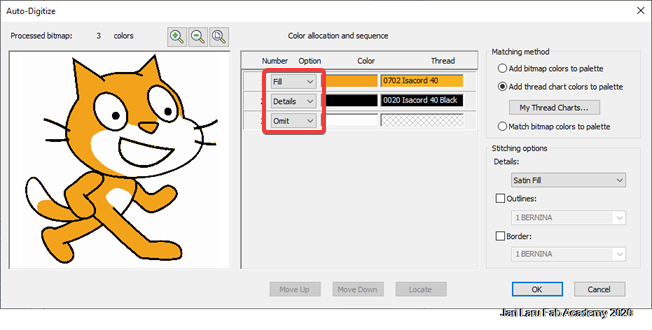
After initial artwork preparation (see figure 6.) Bernina embroidery software went into auto-digitze process where three colors left were recognized and roled as it follows: (see also figure 7)
- Fill color: orange
- Details color: black
- omitted color (color of the fabric): white
If automated process doesnt recognize correct roles for the colors, you can manually pick up/change those
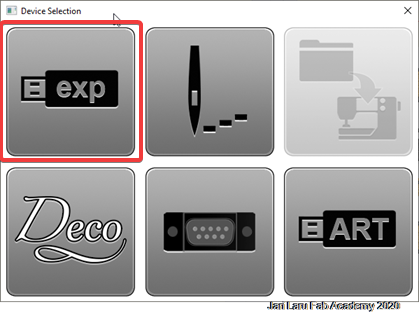
Fourth Step: Move your design from the software to embroidery machine
Following dialog is the last step to be done in the Bernina Embroidery software and it's just related to exporting your design to memory stick.
How to prepare Bernina B540 for embroidery task?
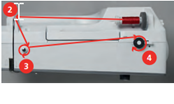
A. FOOT: Attach emrboidery foot to machine
For the embroidery you need special embroidery foot and needle which is suitable for doing embroidery.
Attaching the embroidery foot and selecting the foot in the user interface- Raise the needle.
- Switch the machine off and disconnect it from the power supply system.
- Push the clamping lever up (1).
- Guide the embroidery foot upwards over the cone (2).
- Press the clamping lever down.


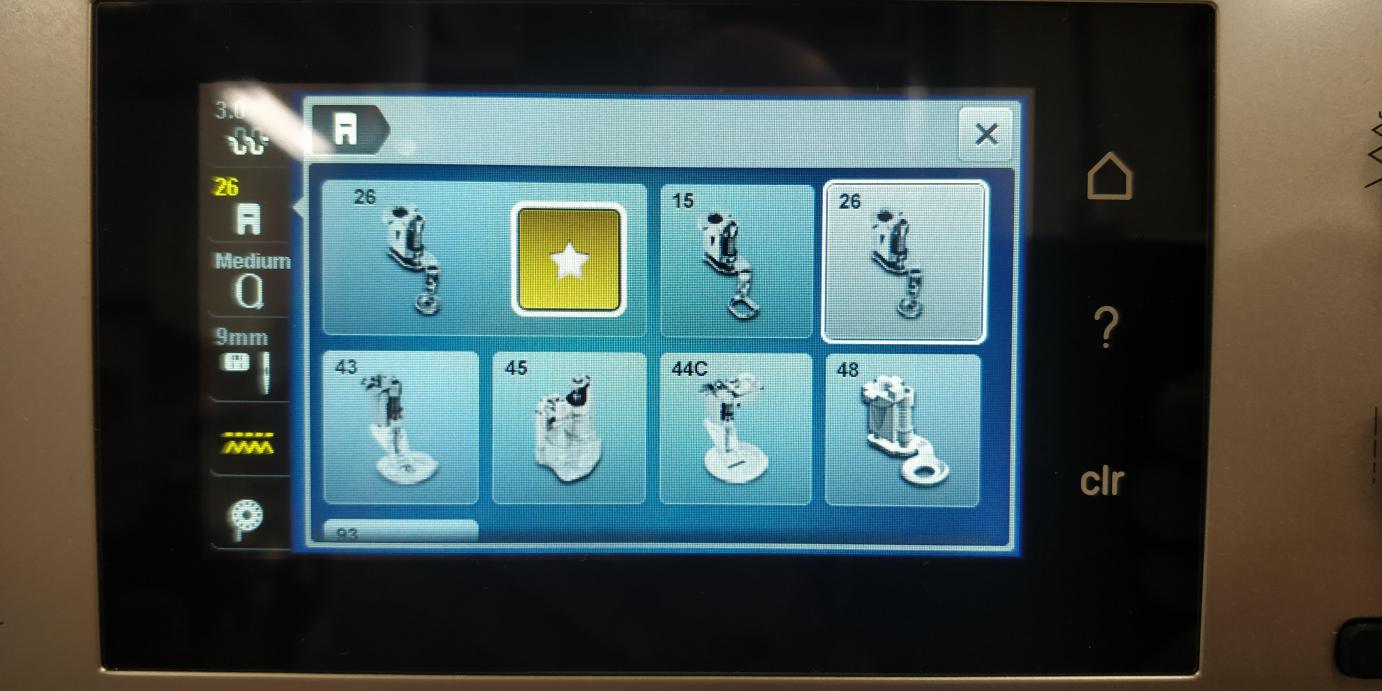
After having attached the respective embroidery foot (Embroidery foot No. 26, supplied accessory with the embroidery module), you can select and save it on the machine.
EXTRA: alternative feets may be displayed which will also be suitable for the selected embroidery motif. I did use just default foot and I recommend it also for other beginners ;)
- Switch the machine on.
- Go to home menu (click home icon [house])
- Turn on embroidery mode (clik embroidery icon [embroidery hoop}
- Select an embroidery motif from the machine or usb stick.
- Touch the icon «Presser foot display/Presser foot selection»
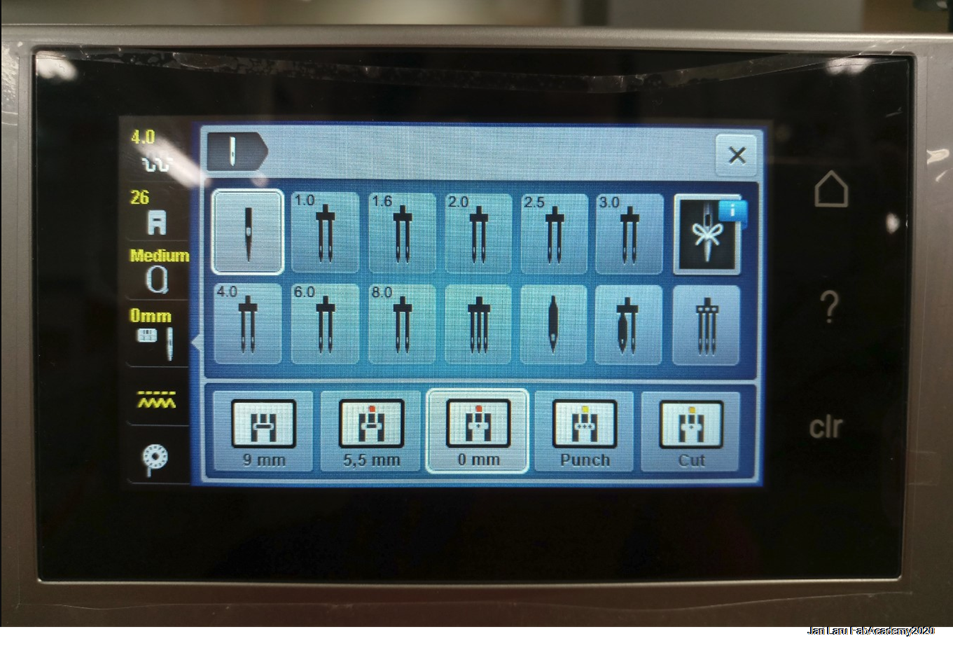
B. NEEDLE: Insert the the embroidery needle abd selecting the needle in the user interface
- Raise the needle.
- Switch the machine off and disconnect it from the power supply system.
- Remove the attached foot.
- Loosen the fixing screw of the needle using the screwdriver gray Torx.
After having changed the needle, it can be checked whether it can be used in combination with the selected stitch plate. .
- Touch the icon «Needle selection».
- Select the inserted needle
C. THREADS. Thread the upper and lower threads
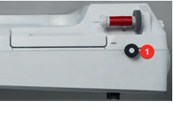
UPPER THREAD: Threading the upper thread
- Place the thread spool on the spool holder so that the thread unwinds clockwise.
- Guide the thread in direction of the arrow through the rear thread guide (1) and hold the thread with the hands so that it is taut and can be inserted into the thread tension.
- Guide the thread in direction of the arrow through the thread tension (2).
- Guide the thread downwards (3) around the thread take-up lever cover (4). .
- Guide the thread upwards and insert into the thread take-up lever (5).
- Guide the thread downwards again (6).
- Guide the thread through the guides (7/8) above the presser foot AND then through the needle
Follow phases 1-4 in figures 14-17
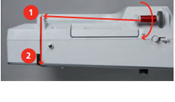

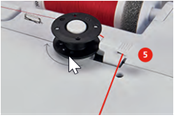
BOBBIN THREAD: Winding the bobbin thread
- Attach the empty bobbin on the winding unit (4) so that the silvery sensor surface is down.
- Guide the thread to the left into the rear thread guide (2).
- Guide the thread around the thread pretension clockwise (3).
- Wind the thread clockwise 2 to 3 times around the empty bobbin (4).
- Pull the excess thread over the thread cutter at the engaging lever (5) and cut.
- Push the engaging lever (6) towards the bobbin.
- Move the slide on the display using the touchscreen pen/finger to adjust the winding speed.
- To stop the winding process, the engaging lever must the pressed to the right.
- Push the engaging lever towards the bobbin again to continue the winding process. – As soon as the bobbin is full, the machine stops the winding process automatically.
- Remove the bobbin and cut the thread using the thread cutter at the engaging lever.
Follow phases 1-2 in the figures 18-19
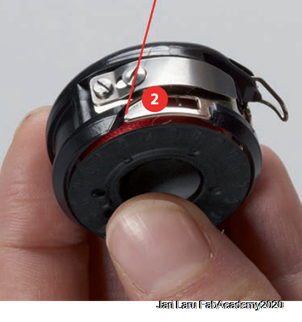
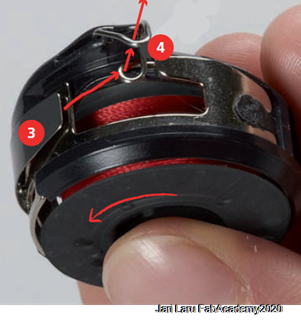
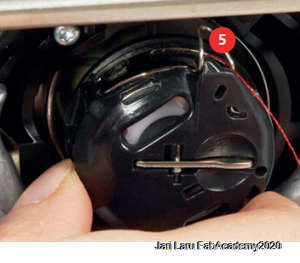
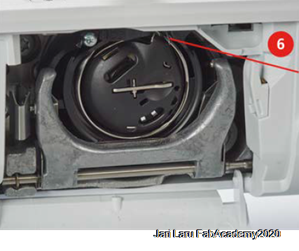
BOBBIN THREAD: Threading the bobbin thread
Follow phases 1-6 in the figures 20-24
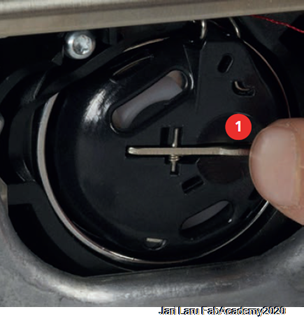
- Press the bobbin case release at the bobbin case.
- Remove the bobbin case
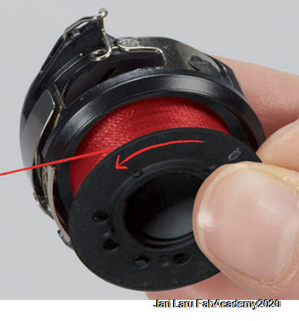
- Remove the bobbin from the bobbin case (1)
- Insert the new bobbin so that the silvery sensor surface is facing the back of the bobbin case
- Pull the thread into the slot (2) from the left.
- Pull the thread to the right under the spring (3), then lead the thread under the two thread guides (4) and pull upwards.
- When inserting into the machine, hold the bobbin case so the thread guide (5) points upwards.
- Insert the bobbin case
- Press onto the center of the bobbin case until it engages.
- Pull the thread through the thread cutter (6) and cut.
- Close the bobbin cover
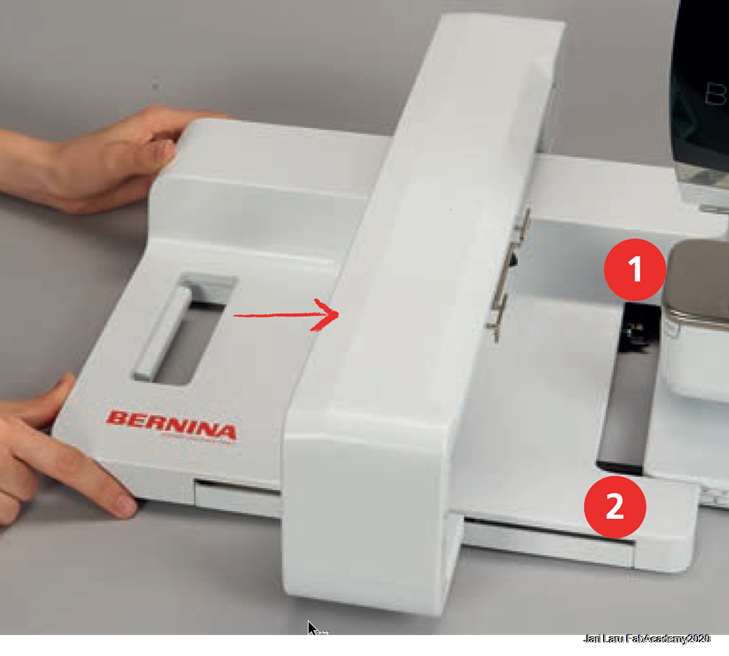
D. EMBROIDERY MODULE: Attaching the embroidery module to sewing machine
This embroidery module is the place where you do connect the hoop. Without embroidery module, you can't actually do embroidery at all.
Attaching the module is simple:
- Ensure that the embroidery arm can move freely.
- Carefully slide the embroidery module from left to right into the machine's embroidery module connection (1) and the guide rail (2)
- To remove, Push the release lever at the carrying handle of the embroidery module, keep it pressed and at the same time, move the embroidery module carefully to the left.
How to prepare fabric for embroidery?
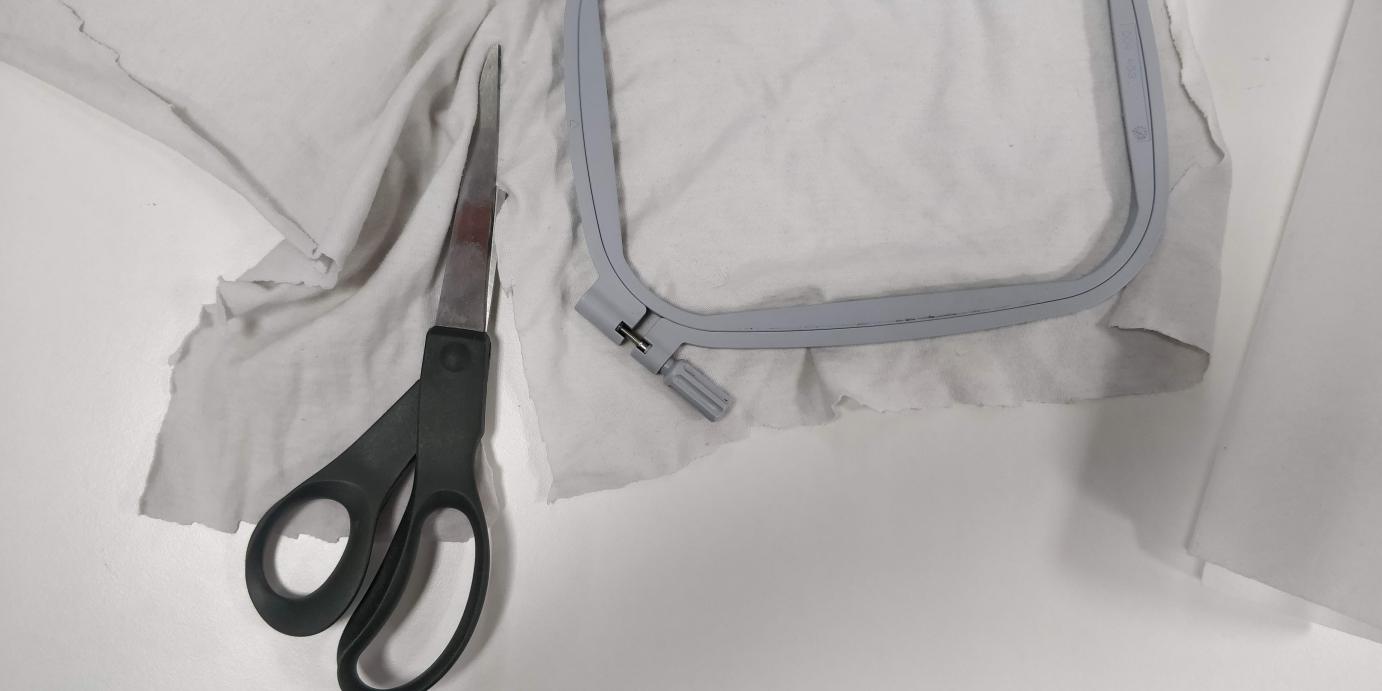
Stabilizer fabric ensures more stability to embroidery
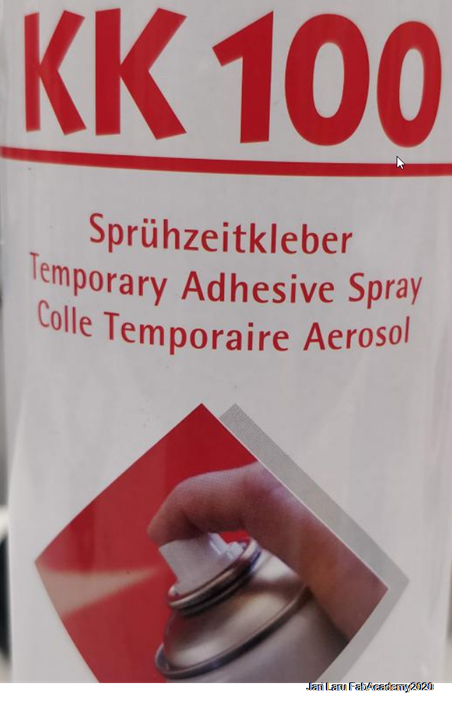
Tear-away stabilizer (see figure 27, right from the embroidery hoop). Stablizer fabrics are available as tear-away and cut-away form. fabric was used to ensure more stability of the embroidery project. In the practise the stabilizer was applied to wrong side of the fabric with temporary adhesive spray (see figure 28)
How to choose the right size of the embroidery hoop?
The best embroidery result is achieved, when the smallest possible hoop for the embroidery motif is used
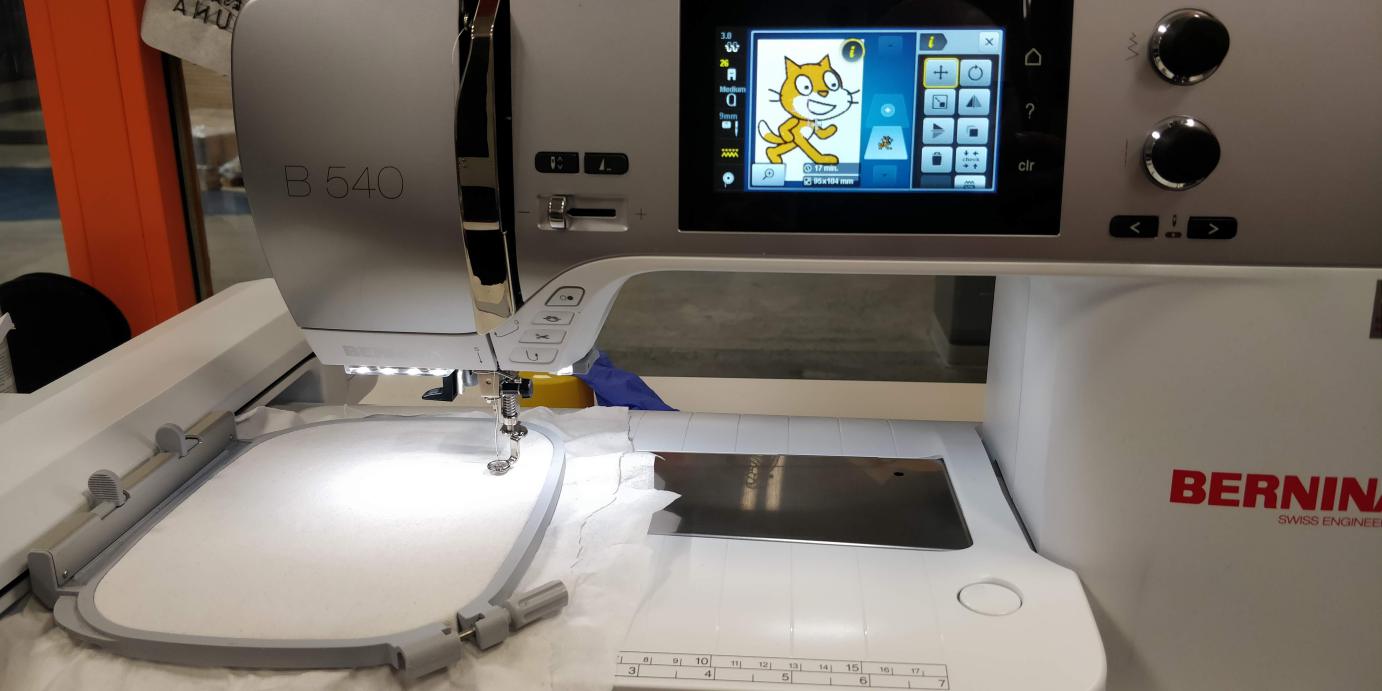
Bernina B540 can suggest the hoop for you, when your embroidery motif is chosen or loaded into machine (see next section about loading motif to machine)
When you have your motif selected (visible on screen, see figure 28), you can touch the icon "hoop selection". Now machine will suggest optimal embroidery hoop size, according to the size of the your embroidery motif.
Then select the (suggested) embroidery hoop (small, medium or large). I did use medium hoop for my embroidery task.
Preparing the embroidery hoop
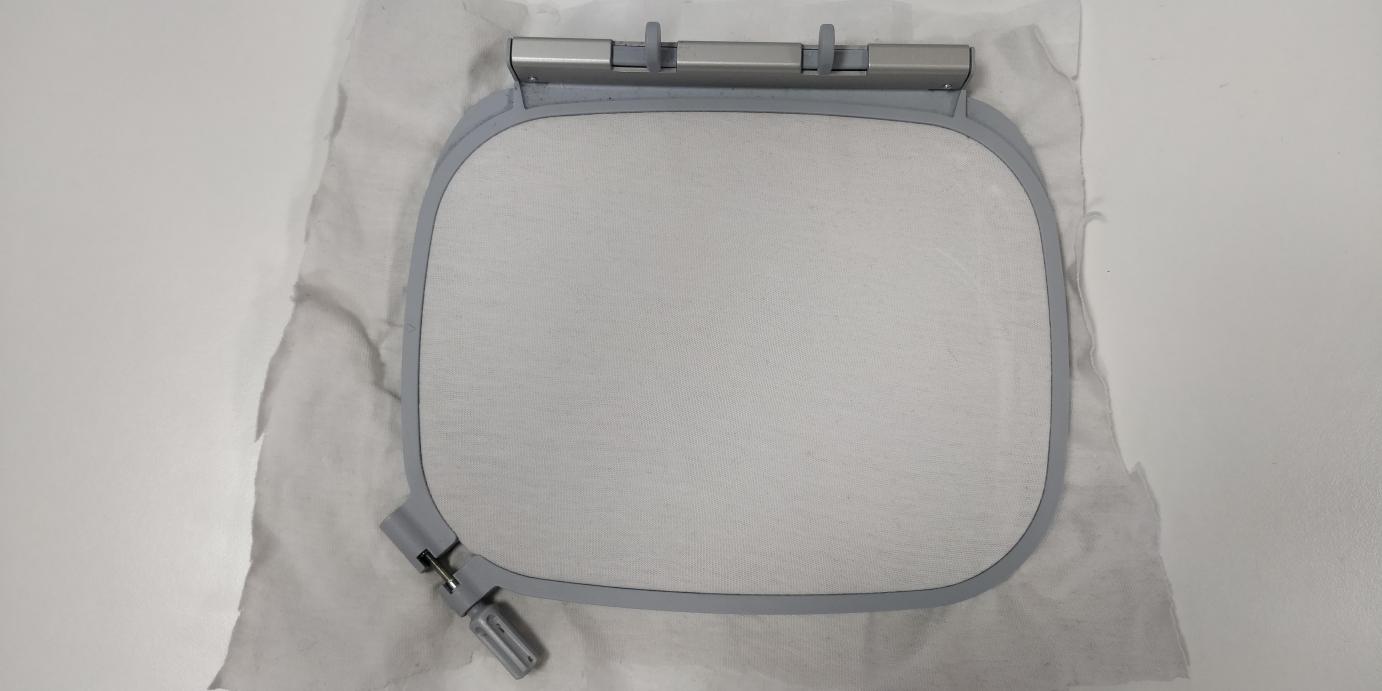
The embroidery hoop consist of an outer and an inner hoop. There is a corresponding template for every hoop (small, medium, big dependengin on size of the embroidery motif). Marks in the template can be transferred to the material.
I didn't use template in my project, because I wasn't cautious about the location of the motif on my fabric. (if you want to use template, please read p. 134 on Bernina B540 Manual for detailed instructions)
Follow this procedure to prepare embroidery hoop without template
- Loosen the screw on the outer hoop
- Remove the inner hoop
- place the material (fabric with stablizer fabric) under inner hoop
- Place the material and the inner hoop on the outer hoop so that the arrows (marks) of both hoops match
- Fit the hoops into each other. Ensure that the material doesn't move.
- Hoop the fabric to be embroidered tightly (see Figure 29)
- Tighten the screw
Attach the hoop into Bernina embroidery machine:
In this phase you will attach the hoop into machine. See the figure 35 what it does like when it attached correctly.
- Raise the needle
- Raise the embroidery foot
- Hold the hoop so that the attaching mechanism is on the left side of the hoop
- Position the hoop below the embroidery foot
- Press both attaching mechanisms of the hoop towards eatch other
- Position embroidery hoop above the bracket of the embroidery arm
- Press the hoop until it clicks in position
- Release the attaching mechanism
How to prepare embroidery motif for embroidery in Bernina machine?
In this phase I was in the situation where I had threaded the machine, prepared fabric and of had motif for embroidery. Next step was to get familiar of the actual embroidery with the Bernina.
First I will briefly explain features on the touchscreen of the machine
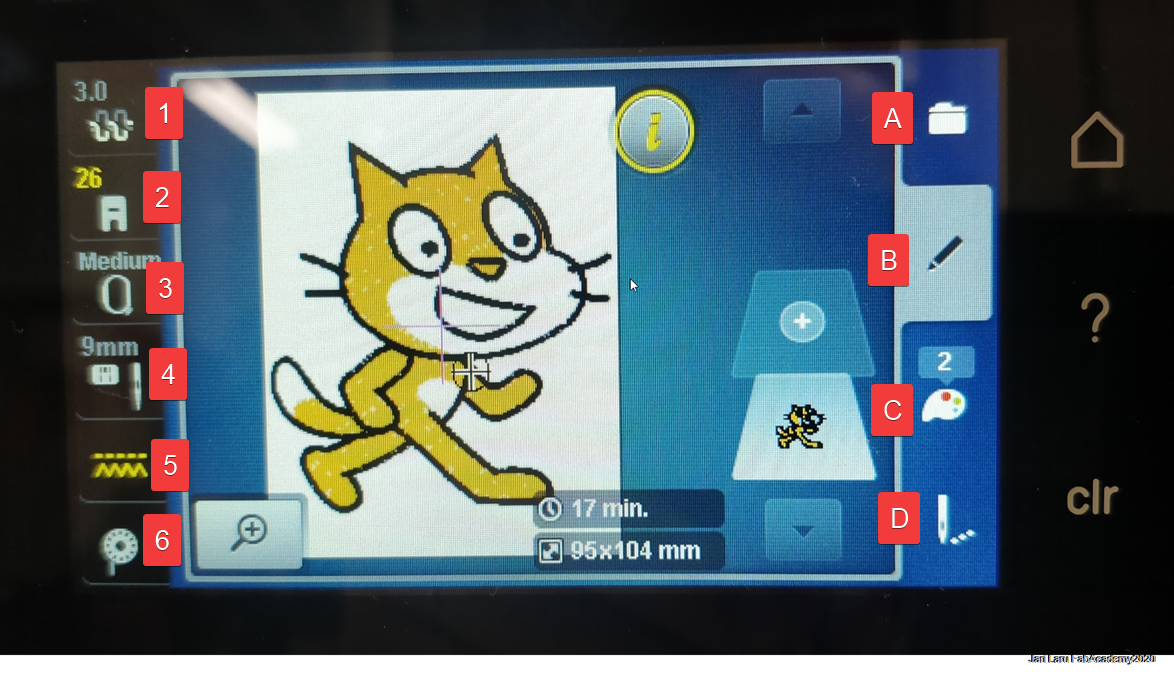
- Upper thread tension
- Presser foot display/Presser foot selection
- Embroidery hoop selection/Embroidery hoop display
- Stich plate/Needle selection
- Feed dog up/down
- Instructions how to thread the bobbin thread
- A. Select embroidery motif
- B. Edit your motif (I already did edit my motif ready for embroidery in the separate software)
- C. Configure color information for embroidery motif (I did chose/limit colors already in the separate software)
- D. Embroidery settings (I didn't change any)
Select embroidery motif
If you don't have your own motif (like I had), you can choose embroidery motif from the default selection available on the machine. You can also use integrated tools to create text-motif (writing).
However, in my case I did have already EXP-file on memory stick. I did prepare my motif by using separate Bernina Embroidery program and then did export my motif to memory stick
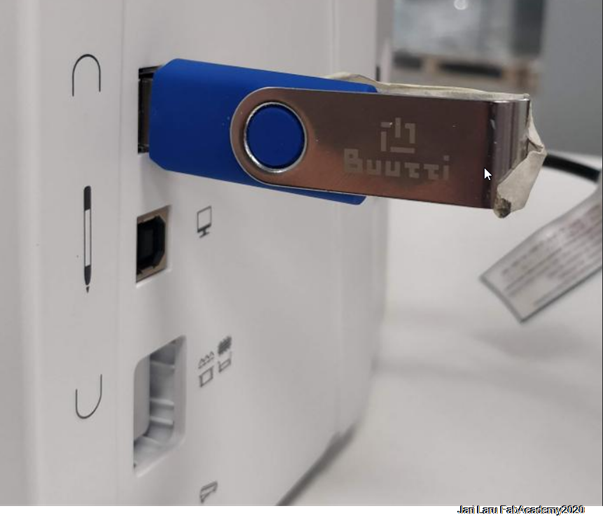
In the figure 30. you can see how I have attached memory stick to the USB connector. You can see also "feed dog button", which is located below of the usb connector. Notice! It's important that during embroidery feed dog button is pushed in!
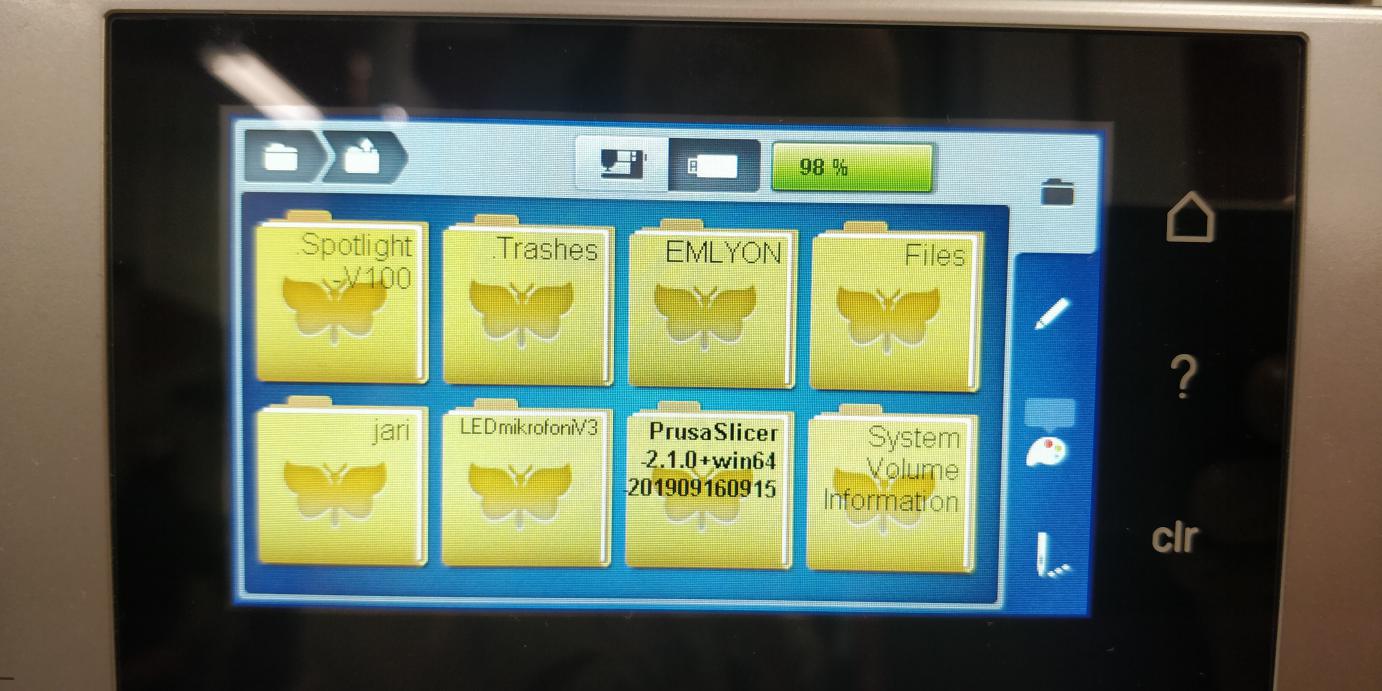
Next I did choose from the user interface "motif dialog" (select embroidery motif in the figure 30 explanation). Because I wanted to open my own EXP file, I did chose USB memory stick and from the list of the folders I chose "Jari" (my name) (see figure 32 below). My embroidery file opened correctly, as you can see from the figure 33.
Edit embroidery motif, change color settings and adjust embroidery settings (if needed)
Next my Embroid motif was opened into edit view (see figure 33). I used this view only to preview my motif, I didn't need to edit it at all (I did use external software for that purpose)
Then I did preview the color information (Figure 34) (set up already in the Bernina embroidery software). Bernina machine shows that I have to change thread two times (orange and black threads).
NOTICE: When compared to user manual (section about the same dialog), color information in my motif is limited: no thread brand information is visible, only numbers 1 and 2). However, I didn't need that spesific info, because we didin't have so wide collection of the brands in the Fab Lab Oulu.
I didn't change anything in this dialog.
Embroidery settings menu looks like that, however, I didin't need to change anything here ;). In normal conditions, you doesn't need to change these settings.
Note! If you havent't attached the embroidery hoop yet, you will see animation about attaching the hoop.
Embroidery in action!
Bernina 540 embroidery machine will do embroidery half-automated: You need to start the process, cut bobbing thread and control the speed of the embroidery process
I didn't understand this at the beginning, instead I used pedal to control the speed. Then I was told that it is automated. Here are steps for automated embroidery process:
Embroidering via the start/stop button
- Push the "start/stop" button to start the embroidery (see figure 36). The machine will stop after about 7 stiches.
- Raise the embroidery foot
- Follow the animation on the screen and cut the bobbin thread. Then touch OK icon to confirm
- Lower the embroidery foot
- Press "start/stop" button to continue
Increasing the embroidery speed
Machine controls the speed of the embroidery process depending on the embroidery position. Howver, you can control the (maximum) speed from the user interface by clicking "rabbit" icon. It has wto positions: standard = optimum speed or maximum speed). You can also use slider in the machine (see the Figure 36) for more finegrained speed control.
However, remember: increased speed means decreased quality in the embroidery
Embroidering via foot control
If you want control the speed and start/stop by yourself during whole embroidery, you can also start embroidery by pressing foot pedal. However, it's only recommended to do only short sequences by using this method.
I started with this manual control, because it was familiar for me from my earlier sewing experiences. However, even simple embroidery takes often >10minutes, so this method is notgood if you want do anything else than sit next to Bernina machine ;)
Difficulties and some reflections
Although embroidery is pretty "easy" and straightforward task, some surprises happened. I already knew from the ealier documentation by Arash Sattari that I have to be cautious about the fabric, embroidery speed and thread tension (no need to change in my case).
So I used as low speed as possible and asked help from FabLab staff about the suitable fabrics for embroidery. By doing so, I avoided some pitfalls, but as my documentation below will tell, I found some new obstabcles.
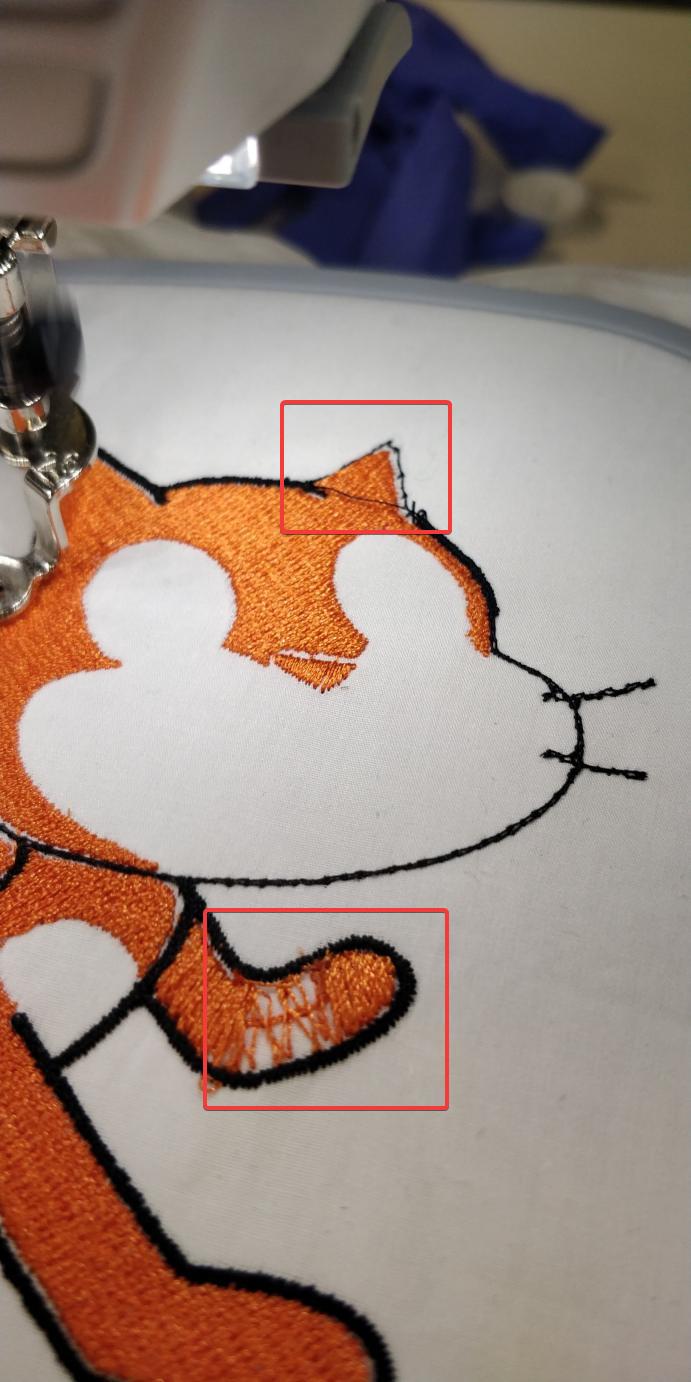
Below you can see two higlights:
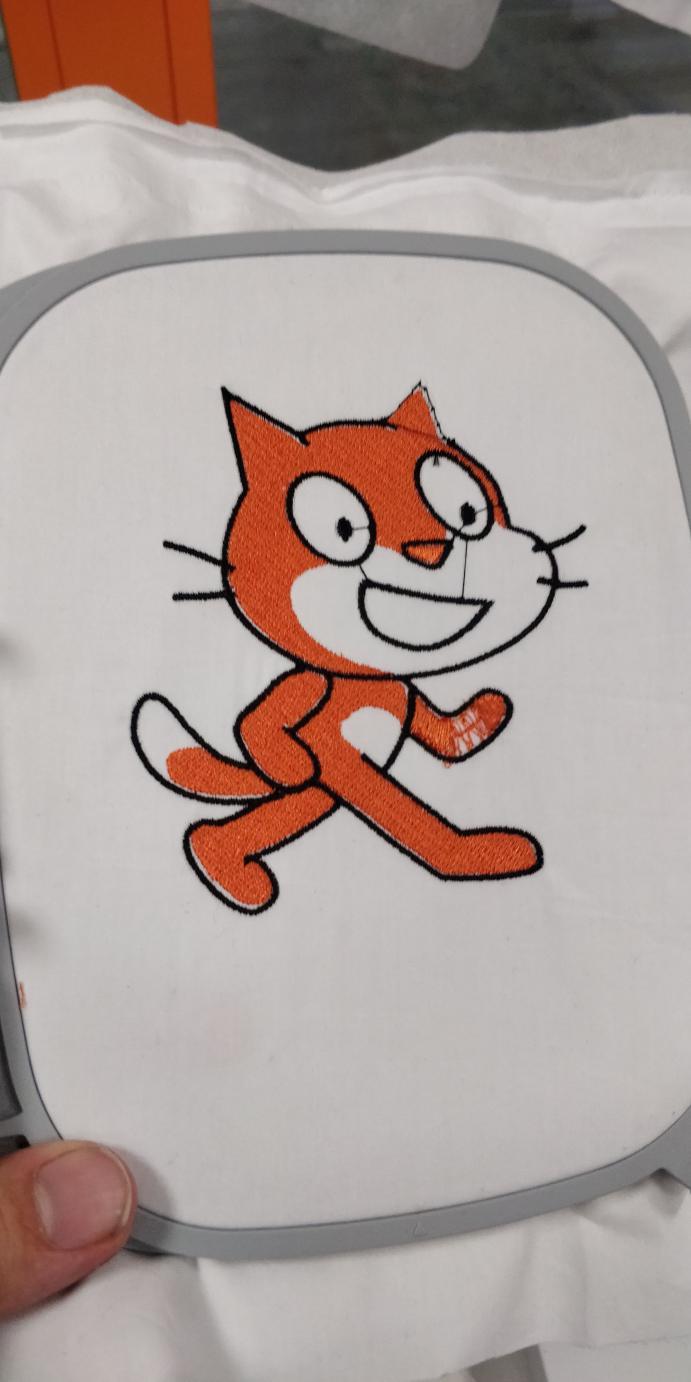
Upper one (ear): is showing the situation where ended during the embroidery process. I did pause the process as soon as possible, but that amount of the embroidery (black thread) was lost. I estimated amount of the thead in the bobbin to be higher than it was. HINT: prepare your own bobbin threads before embroidery
Lower one (feline paw): is demonstrating the situation where "unknown failure" happens on the machine. I clicked "ok" to continue, but reason for the failure remains mystery for me
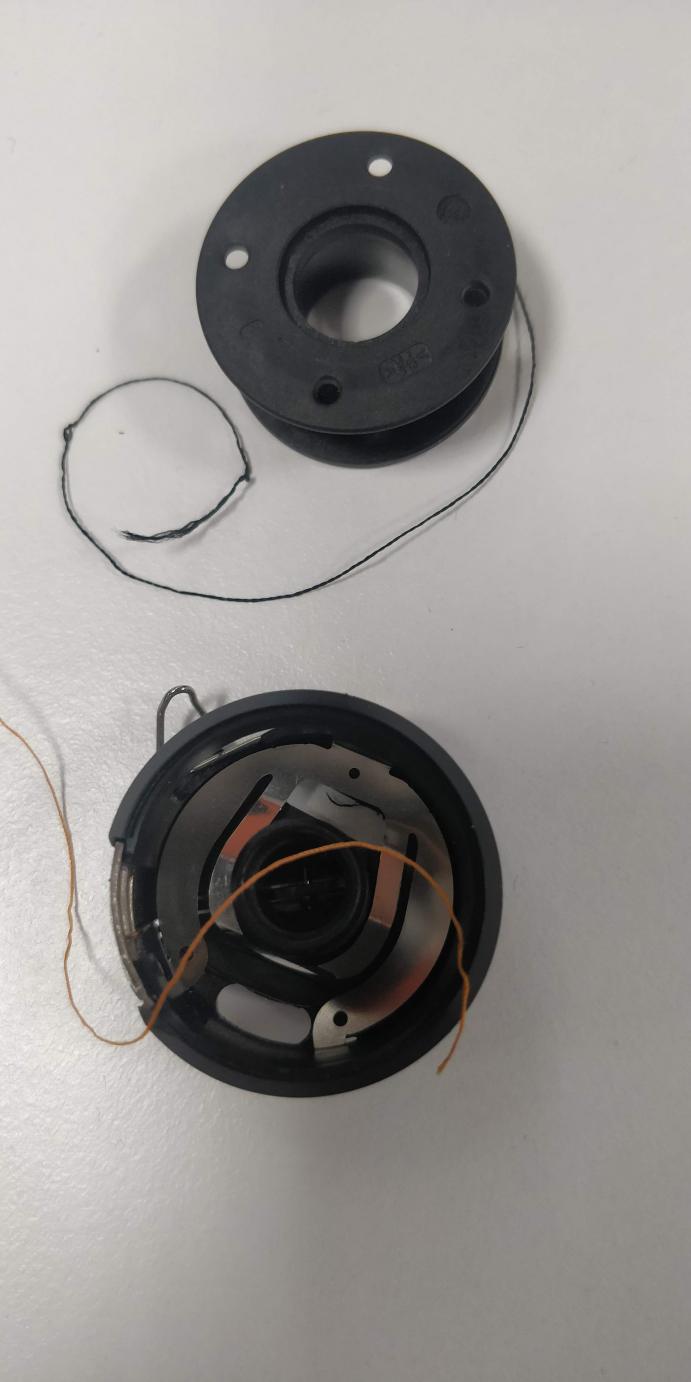
Last figure (39) shows the bobbins after the situation where thread run out from the reel suddenly. I used orange thread for orange color and black for black parts of the scarch cat. So, both bobbin threads did run out during the proceses. Results of the empty black bobbin are visible in the final embroidery.
However, I did learn after the embroidery, that bobbin color is not visible in the embroidery, so it could be e.g. black in all conditions. So the use of orange bobbin wouldn't have been needed anyway :)
Final reflections!
I did like about embroidery. I told about my embroidery experiences to my colleague, who is teaching teacher education students in textile handicrafts. She said that they have pretty similar machine in the textile handicrafts classroom of the faculty of educational sciences. I would be welcome to continue my explorations also with that machine.
I also had plans to do small embroided flag into my final project artefact, remote controlled car, but then I did run out of the time and I had to skip that
Anyway, this machine and task can be recommended to anyone!
Files:
- Vector graphics: docs/wild card week/Scratchcat2.svg
- Bitmap graphics: docs/wild card week/Scratchcat2.png
- Embroidery file: docs/wild card week/Scratch_Cat_Laru_FA2020.exp